Once you get your services up and running, you can log into your domain - in this screenhot "smart4apex" - on the Oracle Cloud.

 Just a few remarks for the designers of this: I am very curious why there is an extra "(Number of ..." in the chart title. The same superflous text is also on another location on that page.
And, more intriguing, what would "0.0323 database instances" mean? 1/0.0323 = 31. So something like days? But February has 28 days...
It would make way more sense to just show here how many instances I had on those day (so, "1" al over the place...).
 These figures indicate, I have a storage limit of 23Gb. But my service is based on 20Gb. So I get 3Gb "for free"!
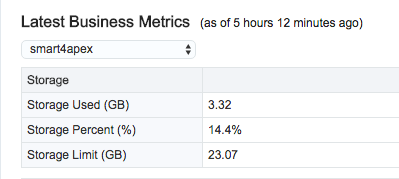
Probably that's (more or less) used by Oracle itself (SYS, APEX etc.). So if you buy 20Gb, you really get 20Gb to store your own data!
 And i can assign Roles to every user. There is a standard list of roles defined. From the documentation I figured out that the first two are entitled to add or modify other users, but what the privileges and restrictions of the other three are, I still have to discover. What I do know is, if you just assign the "Database User" role to a user, you can log in to the My Services page, but if you try to use the Exadata Express service, you get an "Acces Denied" message. You need at least Database Developer or Database Administrator to access the APEX builder (more about that in a later post).

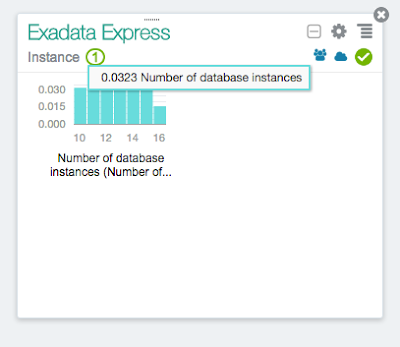
Then you'll end up in the "My Services" dashboard. As I have only one, my dashboard looks quite clean, showing just this widget:
 Just a few remarks for the designers of this: I am very curious why there is an extra "(Number of ..." in the chart title. The same superflous text is also on another location on that page.
And, more intriguing, what would "0.0323 database instances" mean? 1/0.0323 = 31. So something like days? But February has 28 days...
It would make way more sense to just show here how many instances I had on those day (so, "1" al over the place...).
From this widget you can drill into the "Service Details", where you can set rules and alerts and see the (historical) status of your instance. Funny thing is, I noticed this:
 These figures indicate, I have a storage limit of 23Gb. But my service is based on 20Gb. So I get 3Gb "for free"!
Probably that's (more or less) used by Oracle itself (SYS, APEX etc.). So if you buy 20Gb, you really get 20Gb to store your own data!
Now it is time to add some users to this instance. As we - as smart4apex - would like to use it as a development environment, I added all colleagues as a user.
 And i can assign Roles to every user. There is a standard list of roles defined. From the documentation I figured out that the first two are entitled to add or modify other users, but what the privileges and restrictions of the other three are, I still have to discover. What I do know is, if you just assign the "Database User" role to a user, you can log in to the My Services page, but if you try to use the Exadata Express service, you get an "Acces Denied" message. You need at least Database Developer or Database Administrator to access the APEX builder (more about that in a later post).
A nice feature is, you can upload a csv file to create multiple users and assign roles in batch. Saves you a lot of clicks....
And every user you create receives a nice welcome email with a temporary password and a login link. Once you use that link, and login you end up on a (rather outdated - ADF faces built) page of Oracle Identity Self Service to change your password and register three (!) challenge questions. That is a challenge in itself ;-)
Apart from the standard Roles, you can define "Custom Roles" and assign those to users. But any information about how to use these roles in an APEX application is welcome, as I couldn't find any documentation on this subject.
In the next post, I'll go into the database (in)side of the service and in the subsequent one, the APEX development environment of the Exadata Express Cloud Service (EECS).
Comments