The renewed Calendar Region in APEX is awesome. With just one SQL statement you can provide your users with a calendar view of their data that looks very familiar to what they already know, use and love. Apart from one thing: Navigating to a specific date is cumbersome.
The shortest route is:
Way to many clicks!
So how hard can it be to make it easier - more user-friendly? We would like to navigate from both the Month view and the Week view directly into the Day view of a specific date. So with just one click once we have that day in sight.
Dynamic Actions to the rescue. Of course. What else...
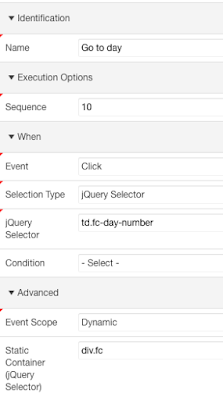 First from the Month view to the Day view:
1. Create a Dynamic Action with the specs as shown to the left. Notice the the Event Scope should be "Dynamic" otherwise it wouldn't work after you navigate to another month. This DA will fire upon a click on the TD element that contains the day number in the Month view.
That TD element contains the actual date as a "data" attribute. So we can access it using
$(this.triggeringElement).data().date
2. The Action is a piece of JavaScript:
// Go to the date of the clicked day
$(this.triggeringElement).closest("div.fc").fullCalendar("gotoDate", $(this.triggeringElement).data().date);
// Switch the view to Day view
$(this.triggeringElement).closest("div.fc").fullCalendar("changeView", "agendaDay");
// Kill the Dialog if you have one
setTimeout( function(){ apex.navigation.dialog.cancel(true); }, 1);
That last line is only necessary when you defined a "Create Link" on your Calendar region. And there are probably better, more elegant, ways of solving that.
Second from the Week view to the Day view:
1. Again, create a Dynamic Action. But now use ".fc-agendaWeek-view th.fc-day-header" as the selector.
In the Week view, the date itself is not contained in the header, but in the TD of another table below the headers. So we have to traverse the DOM a bit to get that clicked date.
2. The JavaScript code is:
var clicked = $(this.triggeringElement);
// find the index
var i = clicked.index();
// find the corresponding day and date
var day = $(clicked).closest("div.fc-agendaWeek-view").find("div.fc-bg td.ui-widget-content").eq(i).data().date;
clicked.closest("div.fc").fullCalendar("gotoDate", day );
clicked.closest("div.fc").fullCalendar("changeView", "agendaDay");
setTimeout( function(){ apex.navigation.dialog.cancel(true); }, 1);
The result is elegant and very intuitive:
 Try it yourself on : apex.oracle.com
Thanks to Marc Sewtz for helping me out finding the "fullCalendar" methods.
The shortest route is:
- Navigate to the right month (can be any number of clicks)
- Switch to "Week view"
- Navigate to the right week (between 0 and 4 clicks)
- Switch to "Day view"
- Navigate to the right dat (between 0 and 7 clicks)
Way to many clicks!
So how hard can it be to make it easier - more user-friendly? We would like to navigate from both the Month view and the Week view directly into the Day view of a specific date. So with just one click once we have that day in sight.
Dynamic Actions to the rescue. Of course. What else...
 First from the Month view to the Day view:
1. Create a Dynamic Action with the specs as shown to the left. Notice the the Event Scope should be "Dynamic" otherwise it wouldn't work after you navigate to another month. This DA will fire upon a click on the TD element that contains the day number in the Month view.
That TD element contains the actual date as a "data" attribute. So we can access it using
$(this.triggeringElement).data().date
2. The Action is a piece of JavaScript:
// Go to the date of the clicked day
$(this.triggeringElement).closest("div.fc").fullCalendar("gotoDate", $(this.triggeringElement).data().date);
// Switch the view to Day view
$(this.triggeringElement).closest("div.fc").fullCalendar("changeView", "agendaDay");
// Kill the Dialog if you have one
setTimeout( function(){ apex.navigation.dialog.cancel(true); }, 1);
That last line is only necessary when you defined a "Create Link" on your Calendar region. And there are probably better, more elegant, ways of solving that.
Second from the Week view to the Day view:
1. Again, create a Dynamic Action. But now use ".fc-agendaWeek-view th.fc-day-header" as the selector.
In the Week view, the date itself is not contained in the header, but in the TD of another table below the headers. So we have to traverse the DOM a bit to get that clicked date.
2. The JavaScript code is:
var clicked = $(this.triggeringElement);
// find the index
var i = clicked.index();
// find the corresponding day and date
var day = $(clicked).closest("div.fc-agendaWeek-view").find("div.fc-bg td.ui-widget-content").eq(i).data().date;
clicked.closest("div.fc").fullCalendar("gotoDate", day );
clicked.closest("div.fc").fullCalendar("changeView", "agendaDay");
setTimeout( function(){ apex.navigation.dialog.cancel(true); }, 1);
The result is elegant and very intuitive:

Thanks to Marc Sewtz for helping me out finding the "fullCalendar" methods.
Comments